When it comes to personalizing your Minecraft server, the icon that represents it is like a flag that sails in the virtual winds of the internet. It’s the first impression players get before they join your world. So, understanding how to change the server icon on Apex Hosting is an essential skill for any server owner looking to stand out. In this article, we’ll delve into the step-by-step process of updating your server icon to refresh your server’s look on Apex Hosting, and we’ll answer some frequently asked questions along the way.
Step-by-Step: How to Change Your Server Icon on Apex Hosting
Changing your server icon on Apex Hosting is not a daunting task. However, it requires careful attention to detail to ensure that your icon looks great and is visible to all potential players. Here’s how to do it:
Step 1: Prepare Your Icon
Before you can change your server icon, you’ll need to prepare an icon that meets Apex Hosting’s requirements:
- Use Image Editing Software: To create a custom server icon, you’ll need image editing software. Programs like Adobe Photoshop or free alternatives like GIMP work well for this purpose. These tools provide the flexibility to design a unique icon that represents your server’s theme or brand;
- Size Appropriately: Apex Hosting requires server icons to have dimensions of 64×64 pixels. It’s essential to ensure that your icon adheres to this specific size, as Minecraft will not recognize any other dimensions for server icons;
- Save in the Right Format: Once your icon is designed, save it as a .PNG file. Additionally, make sure to name the file “server-icon.png.” This specific file format and naming convention are crucial, as they are required by Minecraft to display the server icon correctly.
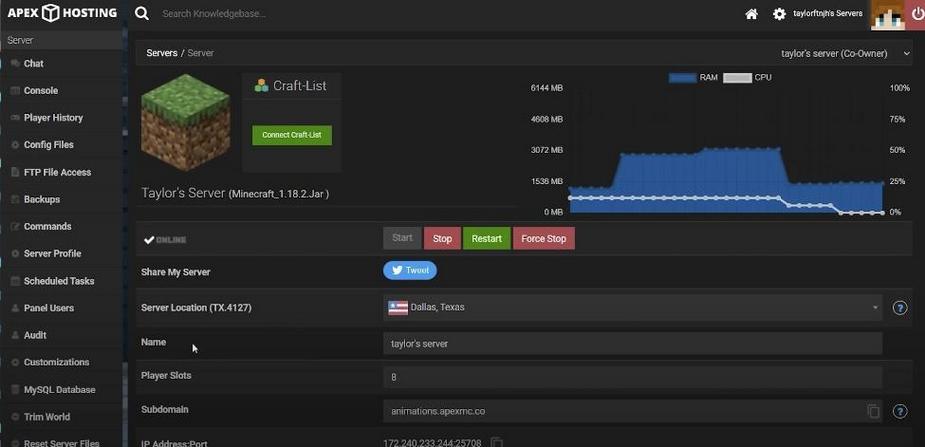
Step 2: Access Your Apex Hosting Server Dashboard
To access your Apex Hosting server dashboard, follow these steps:
- Navigate to the Apex Hosting Website: Open your preferred web browser and go to the official Apex Hosting website;
- Click on “Control Panel”: At the top right corner of the website, you’ll find the “Control Panel” option. Click on it to access your server management dashboard;
- Log In: Provide your login credentials, including your username and password, to log in to your server dashboard.
Step 3: Stop Your Server
Before making any changes to your server icon, it’s essential to stop your server to prevent any potential conflicts or issues. Follow these steps:
- Locate the “Stop” Button: Inside your server dashboard, look for the “Stop” button. It’s typically displayed prominently to ensure easy access;
- Click “Stop”: Click on the “Stop” button to initiate the server shutdown process. Wait for the server’s status to change to “Offline.” This indicates that the server is no longer running.
Step 4: Access the FTP File Access
With your server offline, you can now access the server files using FTP (File Transfer Protocol). Here’s how:
- Access FTP File Access: Within your server control panel, locate and click on the “FTP File Access” button. This feature allows you to manage your server’s files efficiently;
- Enter Your Password: For security reasons, you may be prompted to enter your password again. Provide your password to proceed. This step ensures that only authorized users can access your server’s files.
Step 5: Upload Your Server Icon
Now that you have access to your server files, you can upload your new server icon. Follow these instructions:
- Initiate Upload: Inside FTP File Access, find and click on the “Upload” button. This button is usually located in the top-left area of the page and is marked for easy identification;
- Upload Your Icon: You have two options for uploading your server icon:
| Upload Method | Description |
| Drag and Drop | You can easily drag and drop your “server-icon.png” file directly into the designated upload area. This method is quick and straightforward, allowing for seamless file transfer. |
| File Chooser | Alternatively, you can select your icon file from your computer’s file system using the file chooser option. This method provides a user-friendly interface for file selection. |
- Wait for Upload Completion: It’s essential to allow the upload process to reach 100% before proceeding. This ensures that your server icon is correctly uploaded to your server’s directory.
Step 6: Restart Your Server
After successfully uploading the new server icon, it’s time to restart your server to apply the changes:
- Return to the Main Dashboard: Navigate back to the main server dashboard by using the provided navigation options;
- Click “Start”: Locate the green “Start” button within the dashboard and click on it. This action will initiate the server’s startup process, applying the changes you made.
Step 7: Verify Your Icon
Once your server is back online, it’s crucial to verify that your new icon is displayed correctly. Follow these steps to ensure it’s working as intended:
- Refresh Minecraft Server List: Open your Minecraft client and navigate to the server list section;
- Check for the New Icon: Look for your server in the list; your new icon should now be displayed next to your server’s name. If the icon is not visible, double-check that you followed the previous steps accurately.
Tips for an Effective Server Icon

Creating an eye-catching server icon involves more than just changing the picture. Here are some tips for crafting an effective server icon:
- Brand Appropriately: Choose colors and design elements that represent the theme of your server;
- Clarity is Key: Since the icon is small, avoid overly complex designs that might not scale well;
- Be Unique: Stand out from other servers with a unique design that catches players’ attention.
Troubleshooting Common Issues
Minecraft server icons are a fantastic way to personalize your server and make it more appealing to potential players. However, occasionally, you may encounter issues where your server icon doesn’t appear as expected. Let’s explore common problems related to server icons and provide comprehensive troubleshooting steps to help you resolve them effectively.
Server Icon Doesn’t Appear After Changes
Sometimes, your server icon may not immediately appear in the server list after making changes. This issue can be resolved by refreshing the server list.
- Launch Minecraft and navigate to the multiplayer menu;
- Look for the “Refresh” or “Reload” button; clicking this button will update the server list;
- Check to see if your server icon is now displayed after the list is updated.
Incorrect File Naming
Minecraft requires that the server icon image file be named “server-icon.png” for it to display correctly. Any deviation from this naming convention can lead to issues.
- Verify that the image file is indeed named “server-icon.png.”;
- Double-check the file name for any typos or extraneous characters to ensure accuracy.
Incorrect Icon Size
Minecraft expects the server icon to have specific dimensions: 64×64 pixels. If the image size is incorrect, it may not display correctly or not at all.
- Open the server-icon.png image file using image editing software;
- Resize the image to exactly 64×64 pixels if it’s not already that size;
- Save the image and replace the existing server-icon.png file with the newly resized one.
Icon Doesn’t Register
Occasionally, Minecraft may need to be restarted to properly register the new server icon.
- Close the Minecraft client entirely;
- Relaunch Minecraft;
- Rejoin your server or check the server list to see if the icon is displayed correctly.
Additional Tips and Considerations
In addition to the primary troubleshooting steps, here are some additional tips and considerations to ensure a seamless experience with your Minecraft server icon:
| Permission | Description |
| Permissions | Ensure that you have the necessary permissions to upload a server icon, especially if you’re running your server on a hosting platform. In some cases, limited permissions may prevent you from updating the icon. |
| File Location | Check the file path to confirm that the server-icon.png file is in the correct location within your server’s directory. Placing it in the wrong directory may result in the icon not being recognized. |
| Image Editing Software | Use reliable image editing software to resize and edit your server icon. This will help ensure that the dimensions and quality of the image meet Minecraft’s requirements. |
| Image Format | Make sure your server icon is in the PNG format. Other formats may not be recognized by Minecraft. |
| Backup | Before making any changes to your server icon, consider creating a backup of your existing server-icon.png file. This way, you can easily revert to the previous icon if needed. |
| Cache Clearing | In some cases, clearing your Minecraft client’s cache may help resolve display issues. Consult your client’s documentation for instructions on how to clear the cache. |
Conclusion
Changing your server icon on Apex Hosting is a straightforward process that adds a touch of personal flair to your Minecraft server. By preparing a suitable image, accessing the server dashboard, stopping your server, uploading the new icon via FTP, and then restarting the server, you can refresh your server’s visual identity with ease. Remember the tips for creating a captivating icon and troubleshooting any issues that arise. And with the FAQs in mind, you’re well-equipped to keep your server icon fresh and inviting for all players.
FAQ
Q: Can I use any image format for my server icon?
A: No, the server icon must be a 64×64 pixel .PNG file, named server-icon.png.
Q: Why isn’t my new server icon showing up in Minecraft?
A: Ensure the icon is correctly named, sized, and that you’ve restarted your server. If it still doesn’t show, try restarting your Minecraft client.
Q: How often can I change my server icon on Apex Hosting?
A: You can change it as often as you like, but remember to restart the server after each change for it to take effect.
Q: Does changing the server icon affect server performance?
A: No, changing the icon is purely cosmetic and has no impact on server performance.
Q: Can I animate my server icon?
A: Minecraft does not support animated server icons. The image must be a static 64×64 pixel .PNG file.
Q: Will players be kicked if I change the server icon while the server is running?
A: To change the server icon, you need to stop the server, which will temporarily disconnect any players online.
Q: Can I have multiple icons and switch between them?
A: You can have multiple icons prepared, but you must manually change them in the server files through Apex Hosting’s FTP File Access each time.