Embrace the communal essence of Twitch through hosting; it’s the heart of network growth, shining a spotlight on fellow streamers’ live broadcasts for your viewers to enjoy. But, there arrives an inevitable juncture where you seek to conclude such alliances, perhaps to declutter your channel or to simply mark the end of a hosting chapter. For streamers, mastering the cessation of hosting is as vital as its initiation for maintaining a dynamic and orderly online persona.
Unraveling the Twitch Hosting Phenomenon
Before you can master ending it, you must first understand what hosting on Twitch truly entails. Think of hosting as your channel mirroring another’s live broadcast, a digital endorsement of sorts. It’s an ingenious tactic to back your streaming comrades, keep your channel active during your absence, or present your audience with a medley of handpicked entertainment.
The Strategy Behind Twitch Hosting: Its Rise and Rest
To lend a hand to your fellow creators or diversify your streaming repertoire, navigating the controls of Twitch hosting is key. This guide is designed to elucidate the hosting mechanisms at play – how to kickstart and wrap up your channel’s hosting duties, whether you’re doing it manually or leaving it to the realm of automation.
Starting a Host
Initiating a host on Twitch is a straightforward process. Here’s how to do it:
- Go to your channel’s chat: Access your channel’s chat by logging into your Twitch account and navigating to your channel page;
- Type /host followed by the channel name you want to host: In the chat box, simply type “/host” followed by the name of the Twitch channel you want to host. For example, if you want to host a channel named “ExampleChannel,” you would type “/host ExampleChannel.”
Now that you’ve initiated the host, your channel will start broadcasting the content of the channel you’re hosting.
Stopping a Host
Ending a host on Twitch is just as easy as starting one. To stop hosting, follow these steps:
- Simply type /unhost in your chat: While in your channel’s chat, enter the command “/unhost” and press Enter. This command instructs Twitch to stop hosting the channel immediately.
Congratulations! You have successfully stopped hosting another channel on Twitch. However, there are different scenarios to consider when ending a host, depending on whether you are manually hosting or using auto-hosting.
Manual vs. Auto-Hosting
Twitch offers two hosting modes: manual and auto-hosting. Each mode has its own set of advantages and considerations when it comes to ending a host. Let’s delve into both methods:
Manual Hosting
When you manually host a channel, you have direct control over when to start and stop hosting. To end a manual host session, follow these steps:
- Go to your Twitch channel: Access your channel by logging into your Twitch account and navigating to your channel page;
- Type /unhost in your chat: In your channel’s chat box, enter the command “/unhost” and press Enter. This command will immediately stop hosting the other streamer’s content.
Manual hosting is ideal when you want to have precise control over your channel’s content and decide when to stop hosting.
Auto-Hosting
Auto-hosting is a feature that rotates channels from a list you curate and automatically hosts them when you’re offline. To stop auto-hosting on Twitch, you’ll need to follow these steps:
- Click on your profile icon: In the upper-right corner of the Twitch website, click on your profile icon to access your account settings;
- Navigate to ‘Settings’: From the dropdown menu, select ‘Settings’ to access your account settings;
- Select the ‘Channel and Videos’ tab: In the left sidebar, locate the ‘Channel and Videos’ tab and click on it to open the relevant settings;
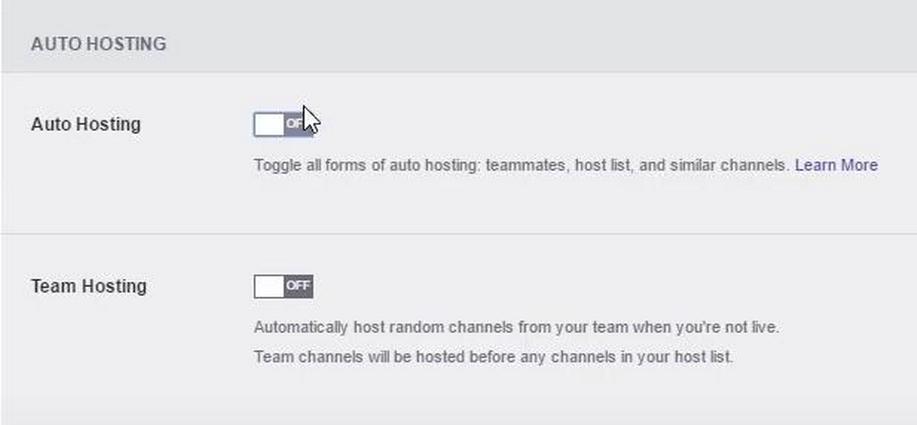
- Scroll down to the ‘Auto Hosting’ section: Continue scrolling down the settings page until you find the ‘Auto Hosting’ section;
- Toggle off ‘Auto host channels’: Within the ‘Auto Hosting’ section, you’ll find a toggle switch labeled ‘Auto host channels.’ Toggle this switch off to disable auto-hosting.
By following these steps, you have successfully disabled auto-hosting on Twitch. This ensures that your channel will no longer automatically host other channels when you’re offline.
The Impact of Not Hosting
When you decide to stop hosting on Twitch, it’s important to understand the potential implications of your actions. Here are some key factors to consider:
- Audience Engagement: When you stop hosting, your channel will return to your offline screen. This transition can affect audience engagement, especially if viewers were actively watching the hosted content. It’s essential to manage this transition smoothly to retain your audience’s interest;
- Community Support: Hosting is not just a feature for promoting other streamers; it’s also a way to support the broader Twitch community. When you stop hosting, you might miss out on community networking opportunities. Hosting other channels can help you build positive relationships with other creators and their audiences.
Troubleshooting Common Hosting Issues

n some cases, stopping a host on Twitch may not go as smoothly as expected. Here are some common issues you might encounter and how to address them:
- Command Not Updating: After typing /unhost, your channel may still appear to be hosting. To resolve this issue, try refreshing your Twitch page. Sometimes, the command simply doesn’t update immediately;
- Accidental Auto-Hosting: If you continue to host unintentionally, double-check if you have accidentally enabled auto-hosting in your settings. Disable it if necessary;
- Restarting Your Stream: If all else fails and you’re still stuck in host mode, consider restarting your stream. This can be an effective way to force your channel to stop hosting and return to your offline screen.
How to Manage Your Hosting Preferences
Twitch offers customization options for managing your hosting preferences. Here’s how to adjust these settings:
- Navigate to ‘Settings’ from your profile icon: Click on your profile icon in the upper-right corner of the Twitch website and select ‘Settings’ from the dropdown menu;
- Click on the ‘Channel and Videos’ tab: In the left sidebar of the Settings page, locate and click on the ‘Channel and Videos’ tab to access the relevant settings;
- In the ‘Auto Hosting’ section, you can manage:
| Channel Preference | Host Similar Channels | Order of Hosting |
| [List of Preferred Channels] | [Yes/No] | [Order Number] |
By tailoring these settings to your preferences, you can control how your channel engages with hosting on Twitch. This allows you to decide which channels to host, whether to support channels similar to yours, and the sequence in which hosted channels are featured.
Best Practices for Hosting on Twitch
While this article primarily focuses on how to stop hosting on Twitch, it’s equally important to adopt best practices when hosting other channels:
- Selective Hosting: Choose channels that align with your content and brand. Hosting content that resonates with your audience can lead to more meaningful interactions;
- Communicate: Inform your audience when you host another channel. Providing context helps your viewers understand why you’re hosting and encourages them to check out the hosted content;
- Host Courtesy: It’s considered good practice to notify a channel before hosting them, if possible. This gesture shows respect and collaboration within the Twitch community.
Conclusion
Twitch hosting is a fantastic way to interact with the streaming community and provide constant material to your audience. Knowing how to terminate a Twitch broadcast is equally crucial. Whether you’re setting up for a live stream of your own or taking a break from hosting others, being aware of the necessary actions and their consequences can help you run your channel like an expert. Thanks to this manual, you’ll know exactly what to do to terminate a Twitch host’s service.
Keep in mind that what makes Twitch so appealing is the freedom it provides streamers to manage their own content and the ways in which they promote that of others. Whether you decide to host or not, you have complete control over your broadcast.
FAQ
Q: Will stopping hosting affect my relationship with other streamers?
A: It depends on how you manage the situation. If you regularly host others, communicate your reasons for stopping. Most streamers understand that hosting preferences can change.
Q: Can I set a schedule for when my channel stops hosting automatically?
A: Twitch doesn’t currently offer a scheduling feature for stopping hosting. You need to do it manually or adjust your auto-hosting settings.
Q: What happens if I accidentally keep hosting a channel longer than intended?
A: If you’ve continued to host a channel by accident, you can simply type /unhost to stop. There’s usually no negative impact, and you can address any audience confusion with a quick explanation.
Q: Is there a limit to how many times I can start and stop hosting on Twitch?
A: Twitch doesn’t impose a limit on the number of times you can start and stop hosting. However, it’s best to use this feature judiciously to avoid confusing your viewers.
Q: Can I remove specific channels from my auto-host list without turning off auto-hosting completely?
A: Yes, you can manage your auto-host list and remove specific channels without disabling the entire auto-host feature. Go to the auto-host settings and adjust your list accordingly.