When it comes to server hosting for your website or online game, the name Bisect Hosting often pops up as a go-to solution. But there might come a time when you need to part ways. Whether you’re scaling down, switching providers, or simply taking a break, knowing how to cancel a Bisect Hosting server is crucial. This guide will navigate you through the process smoothly and ensure that you understand every step of how to cancel a Bisect Hosting server.
Understanding the Cancellation Policy
Before you proceed with how to cancel a Bisect Hosting server, it’s vital to familiarize yourself with their cancellation policy. Bisect Hosting typically allows cancellations at any time, but to avoid unwanted charges, timing is everything. Cancellations do not always lead to refunds, especially if you’re mid-cycle in your billing period. Therefore, ensure you know the cut-off dates and the stipulations tied to refund eligibility.
Step-by-Step: How to Cancel a Bisect Hosting Server
Step 1: Data Backup
Before initiating the cancellation process, it’s essential to back up all your data from the server. This includes game files, configuration settings, and any other data you want to retain. Follow these sub-steps for data backup:
- Use FTP Clients: Connect to your server using FTP (File Transfer Protocol) clients like FileZilla or WinSCP. Download all your server files to your local computer;
- Direct File Download: Alternatively, you can use the file manager provided by Bisect Hosting’s control panel to download your files directly to your local storage;
- Cloud Storage: Consider uploading your server data to a cloud storage service like Google Drive or Dropbox for an extra layer of backup.
Step 2: Log into Your Bisect Hosting Account
To cancel your Bisect Hosting server, you need to access your account on their website. Follow these steps:
- Open your web browser and navigate to the Bisect Hosting website;
- Click on the “Log In” or “Sign In” button to access your account;
- Enter your login credentials, including your username and password;
- Click “Log In” to access your account dashboard.
Step 3: Navigate to Services
Once you are logged in, you will be directed to your account dashboard. To proceed with the cancellation, locate the “Services” section. Here’s how:
- Look for a tab or menu item labeled “Services” or something similar in your account dashboard;
- Click on “Services” to access the section that displays all the active services you have with Bisect Hosting, including your server.
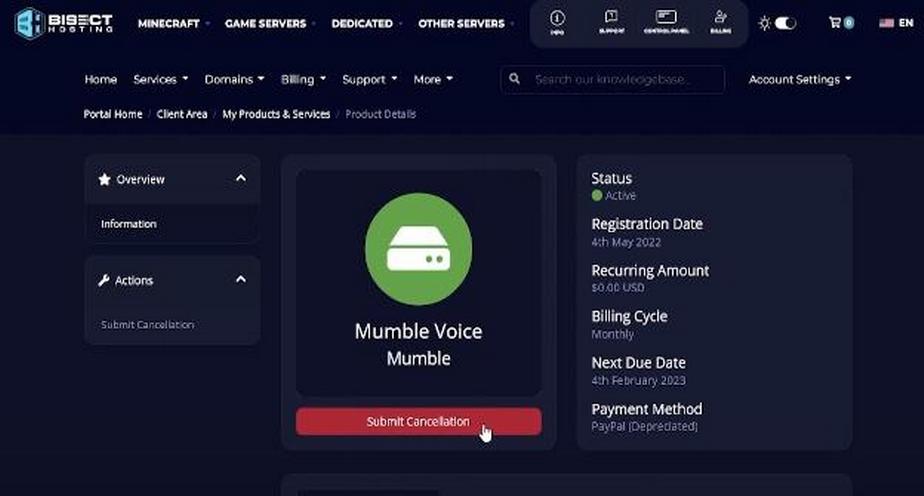
Step 4: Select the Server to Cancel
Within the “Services” section, you should see a list of all your active services, including your Bisect Hosting server. Follow these steps to select the server you wish to cancel:
- Find your server in the list of active services;
- Click on the server’s name or identifier to open the management page for that particular service.
Step 5: Choose ‘Request Cancellation’
Once you are on the management page for your server, you will find an option to initiate the cancellation process. Look for a button or link that says ‘Request Cancellation’ or something similar and click on it.
Step 6: Fill Out the Cancellation Form

Upon selecting the cancellation request, you will be prompted to fill out a cancellation form. This form typically asks for the following information:
- Reason for cancellation (optional);
- Whether you want to cancel immediately or at the end of the billing period.
Complete the form with the required details.
Step 7: Dive into Cancellation Terms
Before you cement your cancellation request, immerse yourself in the intricacies of the cancellation terms and conditions brilliantly displayed on your screen. This treasure trove of information will furnish you with a comprehensive preview of what lies ahead concerning the termination of services and the potential ebb and flow of refunds or charges.
Step 8: Dispatch Your Cancellation Plea
Once you’ve meticulously filled out the cancellation form and explored the labyrinthine terms, proceed to dispatch your cancellation plea into the digital ether. Expect to be met with swift confirmation that Bisect Hosting has gracefully acknowledged your entreaty.
Step 9: Await the Confirmation Missive
Subsequent to dispatching your cancellation request, keep a vigilant eye on your email sanctum. There, nestled amidst the virtual correspondence, you shall find an epistle from Bisect Hosting, a confirmation of your submission. This missive may also unveil the roadmap for the forthcoming steps or solemnize the finality of the cancellation.
Step 10: Stay Prepared for a Necessary Pursuit
Should the confirmation missive elude your inbox or should any unforeseen pecuniary specters haunt your post-cancellation horizon, it becomes paramount to embark on a timely pursuit. Promptly engage Bisect Hosting’s diligent custodial ensemble through their provided contact channels to address any anomalies or disquietudes that may arise.
Double-Checking Everything
It’s always wise to double-check everything when you’re navigating through how to cancel a Bisect Hosting server. Ensure that your data is safely backed up and that there are no pending charges on your account. Keep all confirmation emails and communications from Bisect Hosting in case there are discrepancies later on.
After Cancellation: What’s Next?
Once you’ve learned how to cancel a Bisect Hosting server and have completed the process, it’s time to consider the next steps. If you’re moving to a new hosting service, you’ll want to prepare for transferring your data. If you’re closing down your site or server, make sure you’ve informed any necessary parties such as your website’s visitors or game server’s players.
Conclusion
Understanding how to cancel a Bisect Hosting server is a straightforward process when you follow the correct steps. Remember to always back up your data, review the cancellation terms carefully, and keep an eye on your email for confirmation. If there are any hiccups along the way, Bisect Hosting’s customer support is there to help. While it may be the end of your journey with Bisect Hosting, rest assured that you’re now equipped with the knowledge to end your service smoothly and efficiently.
FAQ
Q: Will I get a refund when I cancel my Bisect Hosting server?
A: Refunds depend on the timing of your cancellation and the terms of service. Typically, if you cancel after the billing period has started, you might not be eligible for a refund.
Q: Can I cancel my Bisect Hosting server immediately?
A: Yes, you can choose to cancel it immediately, but be sure to back up your data first, as immediate cancellation may not give you another chance to do so.
Q: How long does it take for a cancellation to be processed?
A: Cancellations are usually processed fairly quickly, but it can take a few days for everything to be finalized. You’ll receive a confirmation email once the process is complete.
Q: Is it possible to cancel my server and then reactivate it later?
A: This depends on the specific terms of service with Bisect Hosting. Some providers may allow you to reactivate your service, but you may need to go through the setup process again.
Q: How do I know my cancellation request was received?
A: You should receive a confirmation email from Bisect Hosting. If you don’t, reach out to their customer service to ensure your request was processed.
Q: What happens if I change my mind after requesting cancellation?
A: If the cancellation has not been finalized, you may be able to contact customer service to cancel your request. However, once the service is terminated, you may need to start a new contract.