The post The Enigmatic Art of Ceasing Twitch Channel Hosting appeared first on KVCHost.
]]>Unraveling the Twitch Hosting Phenomenon
Before you can master ending it, you must first understand what hosting on Twitch truly entails. Think of hosting as your channel mirroring another’s live broadcast, a digital endorsement of sorts. It’s an ingenious tactic to back your streaming comrades, keep your channel active during your absence, or present your audience with a medley of handpicked entertainment.
The Strategy Behind Twitch Hosting: Its Rise and Rest
To lend a hand to your fellow creators or diversify your streaming repertoire, navigating the controls of Twitch hosting is key. This guide is designed to elucidate the hosting mechanisms at play – how to kickstart and wrap up your channel’s hosting duties, whether you’re doing it manually or leaving it to the realm of automation.
Starting a Host
Initiating a host on Twitch is a straightforward process. Here’s how to do it:
- Go to your channel’s chat: Access your channel’s chat by logging into your Twitch account and navigating to your channel page;
- Type /host followed by the channel name you want to host: In the chat box, simply type “/host” followed by the name of the Twitch channel you want to host. For example, if you want to host a channel named “ExampleChannel,” you would type “/host ExampleChannel.”
Now that you’ve initiated the host, your channel will start broadcasting the content of the channel you’re hosting.
Stopping a Host
Ending a host on Twitch is just as easy as starting one. To stop hosting, follow these steps:
- Simply type /unhost in your chat: While in your channel’s chat, enter the command “/unhost” and press Enter. This command instructs Twitch to stop hosting the channel immediately.
Congratulations! You have successfully stopped hosting another channel on Twitch. However, there are different scenarios to consider when ending a host, depending on whether you are manually hosting or using auto-hosting.
Manual vs. Auto-Hosting
Twitch offers two hosting modes: manual and auto-hosting. Each mode has its own set of advantages and considerations when it comes to ending a host. Let’s delve into both methods:
Manual Hosting
When you manually host a channel, you have direct control over when to start and stop hosting. To end a manual host session, follow these steps:
- Go to your Twitch channel: Access your channel by logging into your Twitch account and navigating to your channel page;
- Type /unhost in your chat: In your channel’s chat box, enter the command “/unhost” and press Enter. This command will immediately stop hosting the other streamer’s content.
Manual hosting is ideal when you want to have precise control over your channel’s content and decide when to stop hosting.
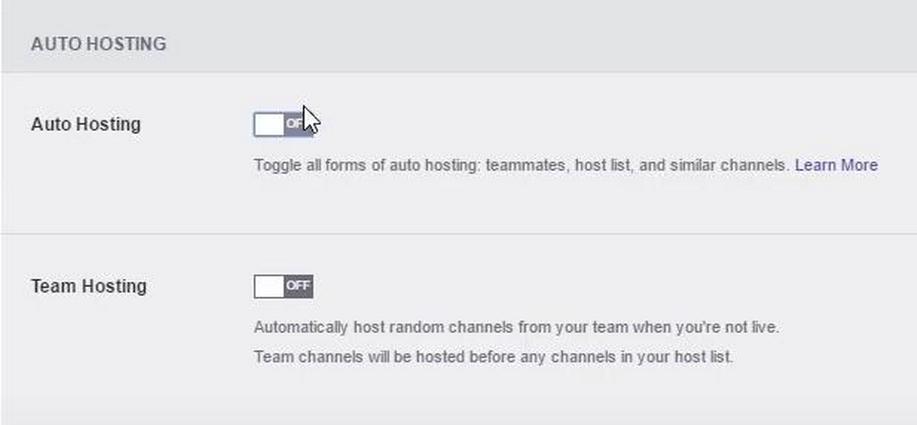
Auto-Hosting
Auto-hosting is a feature that rotates channels from a list you curate and automatically hosts them when you’re offline. To stop auto-hosting on Twitch, you’ll need to follow these steps:
- Click on your profile icon: In the upper-right corner of the Twitch website, click on your profile icon to access your account settings;
- Navigate to ‘Settings’: From the dropdown menu, select ‘Settings’ to access your account settings;
- Select the ‘Channel and Videos’ tab: In the left sidebar, locate the ‘Channel and Videos’ tab and click on it to open the relevant settings;
- Scroll down to the ‘Auto Hosting’ section: Continue scrolling down the settings page until you find the ‘Auto Hosting’ section;
- Toggle off ‘Auto host channels’: Within the ‘Auto Hosting’ section, you’ll find a toggle switch labeled ‘Auto host channels.’ Toggle this switch off to disable auto-hosting.
By following these steps, you have successfully disabled auto-hosting on Twitch. This ensures that your channel will no longer automatically host other channels when you’re offline.
The Impact of Not Hosting
When you decide to stop hosting on Twitch, it’s important to understand the potential implications of your actions. Here are some key factors to consider:
- Audience Engagement: When you stop hosting, your channel will return to your offline screen. This transition can affect audience engagement, especially if viewers were actively watching the hosted content. It’s essential to manage this transition smoothly to retain your audience’s interest;
- Community Support: Hosting is not just a feature for promoting other streamers; it’s also a way to support the broader Twitch community. When you stop hosting, you might miss out on community networking opportunities. Hosting other channels can help you build positive relationships with other creators and their audiences.
Troubleshooting Common Hosting Issues

n some cases, stopping a host on Twitch may not go as smoothly as expected. Here are some common issues you might encounter and how to address them:
- Command Not Updating: After typing /unhost, your channel may still appear to be hosting. To resolve this issue, try refreshing your Twitch page. Sometimes, the command simply doesn’t update immediately;
- Accidental Auto-Hosting: If you continue to host unintentionally, double-check if you have accidentally enabled auto-hosting in your settings. Disable it if necessary;
- Restarting Your Stream: If all else fails and you’re still stuck in host mode, consider restarting your stream. This can be an effective way to force your channel to stop hosting and return to your offline screen.
How to Manage Your Hosting Preferences
Twitch offers customization options for managing your hosting preferences. Here’s how to adjust these settings:
- Navigate to ‘Settings’ from your profile icon: Click on your profile icon in the upper-right corner of the Twitch website and select ‘Settings’ from the dropdown menu;
- Click on the ‘Channel and Videos’ tab: In the left sidebar of the Settings page, locate and click on the ‘Channel and Videos’ tab to access the relevant settings;
- In the ‘Auto Hosting’ section, you can manage:
| Channel Preference | Host Similar Channels | Order of Hosting |
| [List of Preferred Channels] | [Yes/No] | [Order Number] |
By tailoring these settings to your preferences, you can control how your channel engages with hosting on Twitch. This allows you to decide which channels to host, whether to support channels similar to yours, and the sequence in which hosted channels are featured.
Best Practices for Hosting on Twitch
While this article primarily focuses on how to stop hosting on Twitch, it’s equally important to adopt best practices when hosting other channels:
- Selective Hosting: Choose channels that align with your content and brand. Hosting content that resonates with your audience can lead to more meaningful interactions;
- Communicate: Inform your audience when you host another channel. Providing context helps your viewers understand why you’re hosting and encourages them to check out the hosted content;
- Host Courtesy: It’s considered good practice to notify a channel before hosting them, if possible. This gesture shows respect and collaboration within the Twitch community.
Conclusion
Twitch hosting is a fantastic way to interact with the streaming community and provide constant material to your audience. Knowing how to terminate a Twitch broadcast is equally crucial. Whether you’re setting up for a live stream of your own or taking a break from hosting others, being aware of the necessary actions and their consequences can help you run your channel like an expert. Thanks to this manual, you’ll know exactly what to do to terminate a Twitch host’s service.
Keep in mind that what makes Twitch so appealing is the freedom it provides streamers to manage their own content and the ways in which they promote that of others. Whether you decide to host or not, you have complete control over your broadcast.
FAQ
Q: Will stopping hosting affect my relationship with other streamers?
A: It depends on how you manage the situation. If you regularly host others, communicate your reasons for stopping. Most streamers understand that hosting preferences can change.
Q: Can I set a schedule for when my channel stops hosting automatically?
A: Twitch doesn’t currently offer a scheduling feature for stopping hosting. You need to do it manually or adjust your auto-hosting settings.
Q: What happens if I accidentally keep hosting a channel longer than intended?
A: If you’ve continued to host a channel by accident, you can simply type /unhost to stop. There’s usually no negative impact, and you can address any audience confusion with a quick explanation.
Q: Is there a limit to how many times I can start and stop hosting on Twitch?
A: Twitch doesn’t impose a limit on the number of times you can start and stop hosting. However, it’s best to use this feature judiciously to avoid confusing your viewers.
Q: Can I remove specific channels from my auto-host list without turning off auto-hosting completely?
A: Yes, you can manage your auto-host list and remove specific channels without disabling the entire auto-host feature. Go to the auto-host settings and adjust your list accordingly.
The post The Enigmatic Art of Ceasing Twitch Channel Hosting appeared first on KVCHost.
]]>The post Unlocking Your Server’s Identity: Changing Your Apex Hosting Server Icon appeared first on KVCHost.
]]>Step-by-Step: How to Change Your Server Icon on Apex Hosting
Changing your server icon on Apex Hosting is not a daunting task. However, it requires careful attention to detail to ensure that your icon looks great and is visible to all potential players. Here’s how to do it:
Step 1: Prepare Your Icon
Before you can change your server icon, you’ll need to prepare an icon that meets Apex Hosting’s requirements:
- Use Image Editing Software: To create a custom server icon, you’ll need image editing software. Programs like Adobe Photoshop or free alternatives like GIMP work well for this purpose. These tools provide the flexibility to design a unique icon that represents your server’s theme or brand;
- Size Appropriately: Apex Hosting requires server icons to have dimensions of 64×64 pixels. It’s essential to ensure that your icon adheres to this specific size, as Minecraft will not recognize any other dimensions for server icons;
- Save in the Right Format: Once your icon is designed, save it as a .PNG file. Additionally, make sure to name the file “server-icon.png.” This specific file format and naming convention are crucial, as they are required by Minecraft to display the server icon correctly.
Step 2: Access Your Apex Hosting Server Dashboard
To access your Apex Hosting server dashboard, follow these steps:
- Navigate to the Apex Hosting Website: Open your preferred web browser and go to the official Apex Hosting website;
- Click on “Control Panel”: At the top right corner of the website, you’ll find the “Control Panel” option. Click on it to access your server management dashboard;
- Log In: Provide your login credentials, including your username and password, to log in to your server dashboard.
Step 3: Stop Your Server
Before making any changes to your server icon, it’s essential to stop your server to prevent any potential conflicts or issues. Follow these steps:
- Locate the “Stop” Button: Inside your server dashboard, look for the “Stop” button. It’s typically displayed prominently to ensure easy access;
- Click “Stop”: Click on the “Stop” button to initiate the server shutdown process. Wait for the server’s status to change to “Offline.” This indicates that the server is no longer running.
Step 4: Access the FTP File Access
With your server offline, you can now access the server files using FTP (File Transfer Protocol). Here’s how:
- Access FTP File Access: Within your server control panel, locate and click on the “FTP File Access” button. This feature allows you to manage your server’s files efficiently;
- Enter Your Password: For security reasons, you may be prompted to enter your password again. Provide your password to proceed. This step ensures that only authorized users can access your server’s files.
Step 5: Upload Your Server Icon
Now that you have access to your server files, you can upload your new server icon. Follow these instructions:
- Initiate Upload: Inside FTP File Access, find and click on the “Upload” button. This button is usually located in the top-left area of the page and is marked for easy identification;
- Upload Your Icon: You have two options for uploading your server icon:
| Upload Method | Description |
| Drag and Drop | You can easily drag and drop your “server-icon.png” file directly into the designated upload area. This method is quick and straightforward, allowing for seamless file transfer. |
| File Chooser | Alternatively, you can select your icon file from your computer’s file system using the file chooser option. This method provides a user-friendly interface for file selection. |
- Wait for Upload Completion: It’s essential to allow the upload process to reach 100% before proceeding. This ensures that your server icon is correctly uploaded to your server’s directory.
Step 6: Restart Your Server
After successfully uploading the new server icon, it’s time to restart your server to apply the changes:
- Return to the Main Dashboard: Navigate back to the main server dashboard by using the provided navigation options;
- Click “Start”: Locate the green “Start” button within the dashboard and click on it. This action will initiate the server’s startup process, applying the changes you made.
Step 7: Verify Your Icon
Once your server is back online, it’s crucial to verify that your new icon is displayed correctly. Follow these steps to ensure it’s working as intended:
- Refresh Minecraft Server List: Open your Minecraft client and navigate to the server list section;
- Check for the New Icon: Look for your server in the list; your new icon should now be displayed next to your server’s name. If the icon is not visible, double-check that you followed the previous steps accurately.
Tips for an Effective Server Icon

Creating an eye-catching server icon involves more than just changing the picture. Here are some tips for crafting an effective server icon:
- Brand Appropriately: Choose colors and design elements that represent the theme of your server;
- Clarity is Key: Since the icon is small, avoid overly complex designs that might not scale well;
- Be Unique: Stand out from other servers with a unique design that catches players’ attention.
Troubleshooting Common Issues
Minecraft server icons are a fantastic way to personalize your server and make it more appealing to potential players. However, occasionally, you may encounter issues where your server icon doesn’t appear as expected. Let’s explore common problems related to server icons and provide comprehensive troubleshooting steps to help you resolve them effectively.
Server Icon Doesn’t Appear After Changes
Sometimes, your server icon may not immediately appear in the server list after making changes. This issue can be resolved by refreshing the server list.
- Launch Minecraft and navigate to the multiplayer menu;
- Look for the “Refresh” or “Reload” button; clicking this button will update the server list;
- Check to see if your server icon is now displayed after the list is updated.
Incorrect File Naming
Minecraft requires that the server icon image file be named “server-icon.png” for it to display correctly. Any deviation from this naming convention can lead to issues.
- Verify that the image file is indeed named “server-icon.png.”;
- Double-check the file name for any typos or extraneous characters to ensure accuracy.
Incorrect Icon Size
Minecraft expects the server icon to have specific dimensions: 64×64 pixels. If the image size is incorrect, it may not display correctly or not at all.
- Open the server-icon.png image file using image editing software;
- Resize the image to exactly 64×64 pixels if it’s not already that size;
- Save the image and replace the existing server-icon.png file with the newly resized one.
Icon Doesn’t Register
Occasionally, Minecraft may need to be restarted to properly register the new server icon.
- Close the Minecraft client entirely;
- Relaunch Minecraft;
- Rejoin your server or check the server list to see if the icon is displayed correctly.
Additional Tips and Considerations
In addition to the primary troubleshooting steps, here are some additional tips and considerations to ensure a seamless experience with your Minecraft server icon:
| Permission | Description |
| Permissions | Ensure that you have the necessary permissions to upload a server icon, especially if you’re running your server on a hosting platform. In some cases, limited permissions may prevent you from updating the icon. |
| File Location | Check the file path to confirm that the server-icon.png file is in the correct location within your server’s directory. Placing it in the wrong directory may result in the icon not being recognized. |
| Image Editing Software | Use reliable image editing software to resize and edit your server icon. This will help ensure that the dimensions and quality of the image meet Minecraft’s requirements. |
| Image Format | Make sure your server icon is in the PNG format. Other formats may not be recognized by Minecraft. |
| Backup | Before making any changes to your server icon, consider creating a backup of your existing server-icon.png file. This way, you can easily revert to the previous icon if needed. |
| Cache Clearing | In some cases, clearing your Minecraft client’s cache may help resolve display issues. Consult your client’s documentation for instructions on how to clear the cache. |
Conclusion
Changing your server icon on Apex Hosting is a straightforward process that adds a touch of personal flair to your Minecraft server. By preparing a suitable image, accessing the server dashboard, stopping your server, uploading the new icon via FTP, and then restarting the server, you can refresh your server’s visual identity with ease. Remember the tips for creating a captivating icon and troubleshooting any issues that arise. And with the FAQs in mind, you’re well-equipped to keep your server icon fresh and inviting for all players.
FAQ
Q: Can I use any image format for my server icon?
A: No, the server icon must be a 64×64 pixel .PNG file, named server-icon.png.
Q: Why isn’t my new server icon showing up in Minecraft?
A: Ensure the icon is correctly named, sized, and that you’ve restarted your server. If it still doesn’t show, try restarting your Minecraft client.
Q: How often can I change my server icon on Apex Hosting?
A: You can change it as often as you like, but remember to restart the server after each change for it to take effect.
Q: Does changing the server icon affect server performance?
A: No, changing the icon is purely cosmetic and has no impact on server performance.
Q: Can I animate my server icon?
A: Minecraft does not support animated server icons. The image must be a static 64×64 pixel .PNG file.
Q: Will players be kicked if I change the server icon while the server is running?
A: To change the server icon, you need to stop the server, which will temporarily disconnect any players online.
Q: Can I have multiple icons and switch between them?
A: You can have multiple icons prepared, but you must manually change them in the server files through Apex Hosting’s FTP File Access each time.
The post Unlocking Your Server’s Identity: Changing Your Apex Hosting Server Icon appeared first on KVCHost.
]]>The post Unveiling Static Web Hosting: A Comprehensive Guide appeared first on KVCHost.
]]>The Anatomy of Static Web Hosting: How It Works
Static web hosting operates by storing fixed content, predominantly comprising HTML, CSS, and JavaScript files. When a user accesses a website, the server promptly delivers these files. This process eliminates the need for time-consuming backend processing, thereby streamlining the user experience significantly.
Comparing Static and Dynamic Web Hosting
Static vs. Dynamic Web Hosting:
- Static Web Hosting: Resembles a library with the same books available for every visitor;
- Dynamic Web Hosting: Similar to a personal storyteller, creating unique stories for each visitor.
This comparison helps us appreciate the simplicity and efficiency of static hosting in contrast to the more complex and resource-intensive dynamic hosting.
Charting the Benefits: Speed, Security, and Simplicity
The Benefits of Static Web Hosting:
- Speed: Websites load faster due to the absence of complex server-side processing;
- Security: Reduced vulnerability as there are fewer moving parts and less interaction with databases or server-side scripts;
- Simplicity: Easier to manage and deploy, with less need for ongoing maintenance.
These benefits make static web hosting a popular choice for various web projects where quick access and security are top priorities.
Ideal Use Cases: When to Choose Static Web Hosting
Static web hosting shines in scenarios where website content is not frequently updated. It’s particularly well-suited for:
- Blogs with static content;
- Portfolio websites showcasing work;
- Informational websites like documentation or tutorials;
- Landing pages for products or events.
In each of these cases, the need for speed and security trumps the need for regularly updated content.
The Technical Gearbox: Tools and Technologies
The technology stack for static web hosting often includes tools such as Jekyll, Hugo, and GitHub Pages. These platforms are instrumental in transforming plain text into fully functional static websites. They empower developers with the flexibility to create custom websites efficiently and with ease.
Cost Analysis: A Budget-Friendly Hosting Option
Static vs. Dynamic Web Hosting:
| Feature | Static Hosting | Dynamic Hosting |
| Server Resources | Lower Requirement | Higher Requirement |
| Maintenance Cost | Generally Lower | Higher |
| Scalability | Easy and Cost-effective | Often Expensive |
This table illustrates the cost-effectiveness of static web hosting, especially for smaller websites or projects with limited budgets.
Navigating SEO with Static Web Hosting
Embarking on the SEO journey with static web hosting can be a transformative experience. At its essence, static web hosting remarkably enhances SEO endeavors, primarily due to its inherent structure and functionality. One of the most significant benefits in this regard is the speed at which websites load. This facet is crucial, not only because users today demand quick access to information, but also because search engines like Google prioritize faster-loading websites in their rankings. The direct impact of quicker load times on user experience cannot be overstated, as it leads to higher engagement, lower bounce rates, and ultimately, improved search engine visibility.
Another key aspect where static web hosting contributes to SEO is through its stability and reliability. Websites hosted on static platforms generally experience fewer server errors and less downtime. This consistent availability and reliability of the site contribute positively to its overall performance in search engine algorithms. A website that is always accessible and functioning as intended is more likely to gain favor with search engines, thus boosting its SEO potential.
However, static web hosting also requires a proactive strategy for content updates and SEO optimization. Since the content is not dynamically generated, website owners need to regularly update their content to ensure it remains relevant and valuable to their audience. Moreover, SEO practices like keyword optimization, meta descriptions, and alt tags for images need to be meticulously planned and executed. Keeping the content fresh and SEO-friendly is imperative for maintaining and improving search engine rankings, even on a static website.

Challenges and Limitations: A Balanced View
While static web hosting offers a plethora of advantages, it’s not devoid of challenges and limitations. One of the most significant drawbacks is the lack of real-time content updates. In an age where content freshness is key, static websites can lag in providing the most up-to-date information. This limitation can be particularly impactful for news websites, blogs, and other platforms where content relevancy is critical.
Furthermore, static web hosting inherently possesses limited dynamic functionality. This can be a crucial shortcoming for certain types of websites, particularly those that require interactive features, such as e-commerce platforms, customer portals, or websites that rely heavily on user input and interaction. In these scenarios, the absence of server-side processing and database interactions – hallmarks of dynamic websites – means that static sites might not be able to provide the necessary functionality or user experience that these types of projects demand.
To sum up, while static web hosting can significantly bolster SEO efforts and offer a reliable, fast-loading experience, it demands an active approach in terms of content management and SEO strategies. Additionally, its limitations in supporting real-time content updates and dynamic functionalities make it less suited for certain types of web projects. As with any technology choice, understanding these pros and cons is crucial for making informed decisions that align with specific web project goals and requirements.
Future Trends: Static Web Hosting in the Evolving Digital Era
Looking ahead, the trajectory of static web hosting is set to intersect with advancing technologies. We anticipate developments in automation, integration with dynamic features, and enhanced content management systems, all of which will fortify the capabilities of static websites in the digital landscape.
Understanding the Essence of Static Website Hosting
Delving deeper into the question, “What is static website hosting?” helps in demystifying this concept and its importance in the realm of web development. Static website hosting, at its core, involves storing and serving web pages with fixed content. Each page is coded in HTML and is displayed to the user exactly as stored. This contrasts with dynamic web hosting, where web pages are generated in real-time using server-side scripting and databases.
Key Components of Static Website Hosting:
- HTML Files: The backbone of a static website, containing the structure and content;
- CSS Files: These files style the HTML content, dictating the website’s visual aesthetics;
- JavaScript: Used for client-side interactivity, enhancing user experience without altering the site’s static nature;
- Media Files: Images, videos, and other static media elements that are integral to the website’s content.
When a user accesses a static website, the server directly serves these pre-built files, resulting in a straightforward and efficient process. This simplicity is what endows static website hosting with its blazing-fast performance and robust security profile. Unlike dynamic websites, static sites do not require complex back-end processing, making them inherently more stable and less prone to security vulnerabilities commonly associated with server-side scripts and databases.
Comparison of Static and Dynamic Website Hosting:
| Feature | Static Website Hosting | Dynamic Website Hosting |
| Content Nature | Fixed, unchanged | Dynamically generated |
| Load Time | Generally faster | Depends on processing |
| Security | Higher, less vulnerable | Requires more safeguards |
| Scalability | Easy with CDN integration | Complex, server-dependent |
| Maintenance | Minimal | Regular updates needed |
It is evident that static website hosting provides a streamlined, low-maintenance solution for web hosting, particularly advantageous for websites where the content does not require frequent updates.

Conclusion
Static web hosting stands out as a robust, efficient, and cost-effective solution suitable for a diverse range of web projects. Its significance lies in its ability to deliver content at unprecedented speeds while maintaining high levels of security and ease of management. As the digital world continues to evolve, static web hosting is expected to adapt and innovate, offering increasingly sophisticated solutions for the web spaces of the future.
FAQs
What distinguishes static web hosting from dynamic hosting? Static hosting delivers pre-built content, whereas dynamic hosting generates content in real-time, leading to variations in complexity and resource requirements.
Is static web hosting viable for e-commerce websites? While feasible, static hosting may lack dynamic functionalities crucial for e-commerce, making it less ideal for such applications.
How does static web hosting affect SEO? Its fast loading times and fewer server errors positively influence SEO but necessitate strategic content management for ongoing effectiveness.
Can large websites benefit from static web hosting? For websites with frequent content updates, static hosting might pose content management challenges.
What future advancements are expected in static web hosting? Anticipated developments include enhanced automation, dynamic feature integration, and improved content management systems.
The post Unveiling Static Web Hosting: A Comprehensive Guide appeared first on KVCHost.
]]>The post The Ultimate Guide to KS Hosting Install on Firestick appeared first on KVCHost.
]]>The Pre-Install Checklist for KS Hosting on Firestick
Before diving into the installation process, there are a few prerequisites you need to check off your list:
Firestick Device Ready
Make sure your Firestick is properly set up and ready for use. This includes:
- Plugging the Firestick into an available HDMI port on your TV;
- Connecting the Firestick’s power adapter to a power source;
- Turning on your TV and selecting the appropriate HDMI input to which the Firestick is connected.
This step ensures that your Firestick is operational and capable of running the KS Hosting application.
Internet Connection
A reliable internet connection is paramount for a seamless experience with KS Hosting. Here’s what you need to check:
- Wi-Fi Connection: Ensure that your Firestick is connected to your home Wi-Fi network;
- Internet Speed: Verify that your internet connection is fast enough to support streaming content without interruptions. A minimum speed of 10 Mbps is recommended for standard streaming quality.
Having a stable internet connection will allow you to download and stream content from KS Hosting without buffering or lag.
Amazon Account
To access the required features and download apps like KS Hosting on your Firestick, you need to be logged into your Amazon account. Here’s how to check:
- Go to the Firestick home screen;
- Navigate to “Settings” using your remote;
- Select “My Account” and log in with your Amazon account credentials if you are not already logged in.
Ensuring that you are logged into your Amazon account is essential as it grants you access to the Amazon Appstore, where you can find and install the KS Hosting application.
Step-by-Step KS Hosting Install on Firestick
Step 1: Prepare Your Firestick for KS Hosting Install

By default, your Firestick doesn’t allow the installation of apps from unknown sources. Since the KS Hosting app isn’t available on the Amazon App Store, you’ll need to tweak some settings:
- Navigate to Settings: On your Firestick home screen, go to the ‘Settings’ menu;
- Select My Fire TV: Find and select the ‘My Fire TV’ or ‘Device’ option;
- Developer Options: Click on ‘Developer Options’ to access the next set of choices;
- Enable Apps from Unknown Sources: Turn on ‘Apps from Unknown Sources’ to allow the installation of the KS Hosting app.
Step 2: Download Downloader App
With your Firestick ready to accept apps from outside the Amazon App Store, the next step is to get an app that can download the KS Hosting app:
- Return to the Home Screen: Press the home button on your Firestick remote to go back to the main screen;
- Search for Downloader: Use the search feature on your Firestick to find the “Downloader” app. You can do this by navigating to the magnifying glass icon (usually located at the top left or top right corner of the screen) and typing in “Downloader” using the on-screen keyboard;
- Install Downloader: Once you see the “Downloader” app in the search results, select it. You’ll be taken to the app’s page. On this page, you should see an option to “Download” or “Install.” Click on it to start the installation process;
- Launch Downloader: After the installation is complete, you can find the Downloader app in your list of installed apps on the Home Screen. Open it by selecting it.
Step 3: Use Downloader to Get KS Hosting App
Now, you’ll use the Downloader app to download and install the KS Hosting app:
- Open Downloader: Launch the Downloader app once it’s installed;
- Enter KS Hosting URL: Type in the direct URL for the KS Hosting APK file. You will need to get this URL from the official KS Hosting website or a trusted source;
- Download APK: Click ‘Go’ to download the KS Hosting APK file;
- Install KS Hosting: Once downloaded, the installation prompt will appear. Click ‘Install’.
Step 4: Finalize KS Hosting App Setup
After installing the KS Hosting app, a couple of finishing touches are needed:
- Open KS Hosting App: Once the installation is complete, open the KS Hosting app;
- Log In or Sign Up: Enter your credentials if you’re an existing user or sign up for a new account;
- Browse Content: Explore the KS Hosting app and start streaming your favorite content.
Customizing Your KS Hosting Experience
With KS Hosting installed on your Firestick, you can customize your streaming experience. Here are a few tips:
- Favorites List: Add frequently-watched channels to your favorites for easy access;
- Parental Controls: Set up parental controls within the KS Hosting app to manage content visibility;
- Quality Settings: Adjust the streaming quality to match your internet speed and data preferences.
Troubleshooting Common KS Hosting Install Issues
If you encounter issues during the KS Hosting install process, consider these troubleshooting steps:
- Check Internet Connection: A poor connection can interfere with downloading and installing the KS Hosting app;
- Restart Firestick: Sometimes, simply restarting your device can resolve installation hiccups;
- Re-enter URL: Ensure the APK URL for the KS Hosting app is entered correctly in the Downloader app;
- Update Firestick: Running on the latest Firestick software can help avoid compatibility issues.
Conclusion
The installation of the KS Hosting app on your Firestick can greatly enhance your streaming options, offering a wide array of content at your fingertips. By following the steps outlined in this article, you can smoothly execute the KS Hosting install on your Firestick and embark on a journey of endless entertainment.
Remember that keeping the KS Hosting app updated, maintaining a strong internet connection, and following the legal channels for streaming content will contribute to a seamless and enjoyable viewing experience. With KS Hosting installed on your Firestick, the power of quality entertainment is just a few clicks away.
FAQ
Q: Is the KS Hosting app legal?
A: Yes, the KS Hosting app itself is legal to install and use. However, always ensure that you’re streaming content available in the public domain or for which you have the rights.
Q: Will installing KS Hosting void my Firestick warranty?
A: No, installing KS Hosting or any other third-party app will not void your Firestick warranty. However, engaging in piracy can lead to legal and warranty issues.
Q: Can I install KS Hosting on other devices?
A: Absolutely, the KS Hosting app is versatile and can be installed on various devices besides Firestick, including smartphones and tablets.
Q: What should I do if the KS Hosting app is not working after installation?
A: If the KS Hosting app fails to work post-installation, clear the cache, check for updates, or reinstall the app.
Q: Do I need a VPN for streaming on KS Hosting?
A: While not mandatory, using a VPN can provide an added layer of privacy and security when streaming content online.
Q: How often do I need to update the KS Hosting app?
A: It’s a good practice to check for updates regularly, as updates can offer new features and security improvements.
Q: Is there a cost associated with the KS Hosting app?
A: KS Hosting may offer free content but typically requires a subscription for full access to its services.
The post The Ultimate Guide to KS Hosting Install on Firestick appeared first on KVCHost.
]]>The post Overview of Apex Hosting Cancellation: Explanation appeared first on KVCHost.
]]>Steps to Initiate Cancellation
To cancel your Apex Hosting subscription:
- Access Apex WHMCS Billing Area: Visit https://billing.apexminecrafthosting.com/ to start the process;
- Submit Your Cancellation Request: Follow the provided steps to officially request service termination.
Handling PayPal Subscriptions
Important considerations for managing PayPal subscriptions:
- Review Active Subscriptions: Confirm any ongoing PayPal subscriptions linked to Apex Hosting;
- Apex Hosting’s Approach: Apex Hosting aims to cancel PayPal subscriptions through API requests post-cancellation;
- User’s Responsibility: It’s crucial for the user to personally cancel any active PayPal subscriptions related to Apex Hosting.
Completion of Cancellation Request
Cancellation requests can be processed in two ways:
- Immediate Termination: For an instant halt of services;
- End of Billing Cycle Termination: The services will cease at the end of the current billing period.
Comparative Table: Cancellation Options at Apex Hosting
| Cancellation Type | Description | Action Required |
| Immediate Termination | Instantly stops services | Submit request via WHMCS Billing |
| End of Billing Cycle Termination | Services continue until the end of the billing cycle | Submit request via WHMCS Billing, wait for the cycle end |
Managing Financial Responsibilities in Subscription Cancellation
When canceling a subscription with Apex Hosting, it’s essential to consider the financial aspects carefully. This section is dedicated to guiding users through managing their financial responsibilities during the cancellation process. While Apex Hosting simplifies the termination of service through its WHMCS billing area, the responsibility for canceling any associated PayPal subscriptions lies squarely with the user. This step is crucial to prevent any unintended charges or financial discrepancies post-cancellation.
Moreover, users should be aware of the billing cycle and choose the most suitable time for cancellation – immediately or at the end of the current period. This decision can impact final charges or potential refunds. It’s also advisable to review Apex Hosting’s terms of service, particularly the cancellation section, to fully understand any financial implications or obligations. By being proactive and thorough in managing these financial responsibilities, users can ensure a smooth and transparent cancellation process, avoiding any last-minute surprises or misunderstandings related to charges from Apex Hosting.
Conclusion
Concluding the Apex Hosting subscription cancellation process requires attention to detail and a clear understanding of the steps involved. By following the outlined procedure, users can ensure a hassle-free cancellation experience. It’s imperative to remember the responsibility of managing and canceling any linked PayPal subscriptions lies with the user, despite Apex Hosting’s efforts to assist in this area. This guide serves as a comprehensive resource for effectively navigating the cancellation process, offering peace of mind and clarity. Whether opting for immediate termination or waiting until the end of the billing cycle, users are equipped with the necessary knowledge to successfully conclude their subscriptions with Apex Hosting.
The post Overview of Apex Hosting Cancellation: Explanation appeared first on KVCHost.
]]>The post The Ultimate Guide on How to Cancel a Bisect Hosting Server appeared first on KVCHost.
]]>Understanding the Cancellation Policy
Before you proceed with how to cancel a Bisect Hosting server, it’s vital to familiarize yourself with their cancellation policy. Bisect Hosting typically allows cancellations at any time, but to avoid unwanted charges, timing is everything. Cancellations do not always lead to refunds, especially if you’re mid-cycle in your billing period. Therefore, ensure you know the cut-off dates and the stipulations tied to refund eligibility.
Step-by-Step: How to Cancel a Bisect Hosting Server
Step 1: Data Backup
Before initiating the cancellation process, it’s essential to back up all your data from the server. This includes game files, configuration settings, and any other data you want to retain. Follow these sub-steps for data backup:
- Use FTP Clients: Connect to your server using FTP (File Transfer Protocol) clients like FileZilla or WinSCP. Download all your server files to your local computer;
- Direct File Download: Alternatively, you can use the file manager provided by Bisect Hosting’s control panel to download your files directly to your local storage;
- Cloud Storage: Consider uploading your server data to a cloud storage service like Google Drive or Dropbox for an extra layer of backup.
Step 2: Log into Your Bisect Hosting Account
To cancel your Bisect Hosting server, you need to access your account on their website. Follow these steps:
- Open your web browser and navigate to the Bisect Hosting website;
- Click on the “Log In” or “Sign In” button to access your account;
- Enter your login credentials, including your username and password;
- Click “Log In” to access your account dashboard.
Step 3: Navigate to Services
Once you are logged in, you will be directed to your account dashboard. To proceed with the cancellation, locate the “Services” section. Here’s how:
- Look for a tab or menu item labeled “Services” or something similar in your account dashboard;
- Click on “Services” to access the section that displays all the active services you have with Bisect Hosting, including your server.
Step 4: Select the Server to Cancel
Within the “Services” section, you should see a list of all your active services, including your Bisect Hosting server. Follow these steps to select the server you wish to cancel:
- Find your server in the list of active services;
- Click on the server’s name or identifier to open the management page for that particular service.
Step 5: Choose ‘Request Cancellation’
Once you are on the management page for your server, you will find an option to initiate the cancellation process. Look for a button or link that says ‘Request Cancellation’ or something similar and click on it.
Step 6: Fill Out the Cancellation Form

Upon selecting the cancellation request, you will be prompted to fill out a cancellation form. This form typically asks for the following information:
- Reason for cancellation (optional);
- Whether you want to cancel immediately or at the end of the billing period.
Complete the form with the required details.
Step 7: Dive into Cancellation Terms
Before you cement your cancellation request, immerse yourself in the intricacies of the cancellation terms and conditions brilliantly displayed on your screen. This treasure trove of information will furnish you with a comprehensive preview of what lies ahead concerning the termination of services and the potential ebb and flow of refunds or charges.
Step 8: Dispatch Your Cancellation Plea
Once you’ve meticulously filled out the cancellation form and explored the labyrinthine terms, proceed to dispatch your cancellation plea into the digital ether. Expect to be met with swift confirmation that Bisect Hosting has gracefully acknowledged your entreaty.
Step 9: Await the Confirmation Missive
Subsequent to dispatching your cancellation request, keep a vigilant eye on your email sanctum. There, nestled amidst the virtual correspondence, you shall find an epistle from Bisect Hosting, a confirmation of your submission. This missive may also unveil the roadmap for the forthcoming steps or solemnize the finality of the cancellation.
Step 10: Stay Prepared for a Necessary Pursuit
Should the confirmation missive elude your inbox or should any unforeseen pecuniary specters haunt your post-cancellation horizon, it becomes paramount to embark on a timely pursuit. Promptly engage Bisect Hosting’s diligent custodial ensemble through their provided contact channels to address any anomalies or disquietudes that may arise.
Double-Checking Everything
It’s always wise to double-check everything when you’re navigating through how to cancel a Bisect Hosting server. Ensure that your data is safely backed up and that there are no pending charges on your account. Keep all confirmation emails and communications from Bisect Hosting in case there are discrepancies later on.
After Cancellation: What’s Next?
Once you’ve learned how to cancel a Bisect Hosting server and have completed the process, it’s time to consider the next steps. If you’re moving to a new hosting service, you’ll want to prepare for transferring your data. If you’re closing down your site or server, make sure you’ve informed any necessary parties such as your website’s visitors or game server’s players.
Conclusion
Understanding how to cancel a Bisect Hosting server is a straightforward process when you follow the correct steps. Remember to always back up your data, review the cancellation terms carefully, and keep an eye on your email for confirmation. If there are any hiccups along the way, Bisect Hosting’s customer support is there to help. While it may be the end of your journey with Bisect Hosting, rest assured that you’re now equipped with the knowledge to end your service smoothly and efficiently.
FAQ
Q: Will I get a refund when I cancel my Bisect Hosting server?
A: Refunds depend on the timing of your cancellation and the terms of service. Typically, if you cancel after the billing period has started, you might not be eligible for a refund.
Q: Can I cancel my Bisect Hosting server immediately?
A: Yes, you can choose to cancel it immediately, but be sure to back up your data first, as immediate cancellation may not give you another chance to do so.
Q: How long does it take for a cancellation to be processed?
A: Cancellations are usually processed fairly quickly, but it can take a few days for everything to be finalized. You’ll receive a confirmation email once the process is complete.
Q: Is it possible to cancel my server and then reactivate it later?
A: This depends on the specific terms of service with Bisect Hosting. Some providers may allow you to reactivate your service, but you may need to go through the setup process again.
Q: How do I know my cancellation request was received?
A: You should receive a confirmation email from Bisect Hosting. If you don’t, reach out to their customer service to ensure your request was processed.
Q: What happens if I change my mind after requesting cancellation?
A: If the cancellation has not been finalized, you may be able to contact customer service to cancel your request. However, once the service is terminated, you may need to start a new contract.
The post The Ultimate Guide on How to Cancel a Bisect Hosting Server appeared first on KVCHost.
]]>The post Deciphering Economy Linux Hosting with cPanel appeared first on KVCHost.
]]>Comprehending the concept of Economy Linux Hosting with cPanel
To dissect what is economy Linux hosting with cPanel, let’s break it down into its components:
- Economy Hosting: This refers to a cost-effective hosting plan designed for users looking to balance functionality and affordability. It’s a perfect starting point for small to medium-sized websites.
- Linux Hosting: Linux hosting implies that the server’s operating system is Linux, an open-source software platform renowned for its stability and security.
- cPanel: cPanel is a web-based hosting control panel that provides a user-friendly interface for managing a web hosting account. It simplifies tasks such as website publishing, managing domains, organizing web files, and creating email accounts.
When combined, what is economy Linux hosting with cPanel offers a hosting solution that is both budget-friendly and robust, powered by the Linux operating system, and streamlined by the simplicity of cPanel.
The Merits of Economy Linux Hosting with cPanel
Why do users gravitate towards economy Linux hosting with cPanel? Here’s a rundown of its benefits:
- Cost-Effectiveness: The “economy” part of economy Linux hosting with cPanel is no misnomer. Users get essential hosting services at a fraction of the cost of more advanced plans;
- Stability and Reliability: Linux is revered for its solid performance and uptime, ensuring that websites are running smoothly and efficiently;
- User-Friendly cPanel: cPanel’s intuitive dashboard makes website management accessible even to novices, eliminating the steep learning curve associated with other control panels;
- Security: Linux’s architecture is known for its robust security features, making economy Linux hosting with cPanel a secure option for hosting needs;
- Flexibility: With cPanel, users have the flexibility to install numerous applications and CMSs like WordPress, Joomla, or Drupal with just a few clicks.
What is Economy Linux Hosting with cPanel Best Suited For?
So, what is economy Linux hosting with cPanel ideally used for? Its versatility makes it suitable for a variety of users and purposes:
- Small Business Websites: Small businesses can benefit from the affordability and ease of use that economy Linux hosting with cPanel offers;
- Personal Blogs and Portfolios: Bloggers and professionals looking to showcase their work can rely on this hosting type for a cost-effective online presence;
- Start-up Projects: Start-ups needing to establish an online base can utilize economy Linux hosting with cPanel as a launching pad;
- Learning and Development: Students and developers experimenting with web design and development can utilize the flexibility and affordability of this hosting type.
Features to Expect with Economy Linux Hosting with cPanel

What is economy Linux hosting with cPanel packed with in terms of features? Generally, one can expect:
Disk Space and Bandwidth
One of the fundamental features of any hosting plan is the allocation of disk space and bandwidth. Economy Linux Hosting with cPanel typically provides users with a sufficient amount of both, making it suitable for hosting small to medium-sized websites. Here’s what you can expect:
| Feature | Description |
| Disk Space | Economy plans generally offer ample disk space to store your website files, databases, and other content. The specific amount can vary depending on the hosting provider, but it’s typically more than enough for most small to medium-sized websites. |
| Bandwidth | Bandwidth determines how much data can be transferred to and from your website. Economy plans usually come with sufficient bandwidth to accommodate moderate levels of website traffic. However, it’s important to monitor your usage if your website experiences a significant increase in traffic. |
Email Accounts
Having a professional email setup associated with your domain is crucial for establishing credibility and effective communication. Economy Linux Hosting with cPanel includes the ability to create and manage email accounts using your domain name. Here are the details:
- Professional Email Addresses: You can create email addresses that match your domain (e.g., [email protected]), giving your communication a more professional and branded appearance;
- Email Management: cPanel provides an intuitive interface for managing your email accounts. You can add, delete, and modify email addresses, set up forwarding rules, and configure autoresponders.
Database Management
Databases are essential for many websites, especially those running content management systems (CMSs) or other dynamic applications. Economy Linux Hosting with cPanel offers robust database management tools:
- MySQL Databases: cPanel typically supports MySQL databases, one of the most widely used database systems for web applications. You can create, manage, and secure your databases through the cPanel interface;
- phpMyAdmin: phpMyAdmin is a popular web-based database management tool that is often included with cPanel. It allows you to interact with your MySQL databases through a user-friendly interface, making tasks like importing, exporting, and querying data easier.
One-Click Installers
Installing web applications manually can be a complex and time-consuming process. Economy Linux Hosting with cPanel simplifies this by offering one-click installers or application auto-installers. Some common features include:
- Softaculous or Installatron: These are popular one-click installer scripts that come integrated with cPanel. They provide access to a wide range of applications, including content management systems like WordPress, e-commerce platforms like Magento, and more;
- Ease of Use: One-click installers are designed to be user-friendly, allowing even beginners to quickly install and configure complex web applications without needing technical expertise.
Backup Tools
Data security is paramount for any website owner. Economy Linux Hosting with cPanel includes backup tools to help you protect your website data:
- Regular Backups: Many hosting providers offer automated backup solutions that take regular snapshots of your website’s files and databases. These backups are crucial for data recovery in case of accidental data loss or website issues;
- Backup Management: cPanel provides an interface for managing and restoring backups. You can schedule backups, download them for offline storage, and restore your website to a previous state if needed.
Optimizing Your Experience with Economy Linux Hosting with cPanel
To make the most out of what is economy Linux hosting with cPanel, consider the following tips:
- Regularly Update Applications: Keep all software up to date to ensure security and performance;
- Utilize Built-in Analytics: Use cPanel’s analytics tools to monitor your site’s performance and make informed decisions;
- Leverage Security Features: Make full use of the security features offered by cPanel to protect your site;
- Monitor Resources: Keep an eye on your resource usage to ensure your site runs smoothly and upgrade plans if necessary.
Conclusion
What is economy Linux hosting with cPanel? It is an affordable, reliable, and user-friendly option for individuals and small businesses to host their websites. Its blend of cost-efficiency, stability, and ease of use makes it a compelling choice for those stepping into the digital space. By understanding what economy Linux hosting with cPanel brings to the table, you can make an informed decision that aligns with your online ambitions and scales with your growth. Whether you’re a budding entrepreneur, a hobbyist blogger, or a seasoned developer, economy Linux hosting with cPanel provides a solid foundation for your online endeavors.
FAQ
Can I upgrade from economy Linux hosting with cPanel to a more advanced plan?
Yes, most service providers offer easy upgrades to higher-tier plans as your website grows.
Is technical knowledge required to manage economy Linux hosting with cPanel?
While some technical understanding is helpful, cPanel’s interface is designed for users of all skill levels.
What kind of customer support can I expect with economy Linux hosting with cPanel?
Most hosting providers offer customer support through various channels like phone, email, and live chat.
Are there any hidden costs associated with economy Linux hosting with cPanel?
Typically, the costs are straightforward, but always review the terms for any additional fees for services like domain registration or SSL certificates.
How does economy Linux hosting with cPanel handle website backups?
cPanel often includes tools to schedule and manage backups, but the specifics can vary by provider.
Can I host multiple websites with economy Linux hosting with cPanel?
This depends on your hosting plan. Some economy plans may allow multiple domains, while others might be limited to a single website.
The post Deciphering Economy Linux Hosting with cPanel appeared first on KVCHost.
]]>